LANGUAGE  
MEMBERS
Forgot your password?
NOT REGISTERED YET?
WHAT CAN I DO?
- Add a model to my Showroom (need to Login or Register)

- View my Favourite Showrooms

- Search for other members' Showrooms

- To know other members from Community

- Browse our Forums

TODAY IN MODELERSITE.COM
See more >>
MODELER SITE - THE MAGAZINE

 
MAILING
If you want to be noticed about updates, please join your email to the list.
SUBMIT YOUR E-MAIL
  TECHNIQUES
>> Airbrushing: FAQ
>> A weathering technique using salt
>> Applying decals on cars and motorcycles
>> Building a  vacu airplane kit
>> Equivalences for racing colours with Tamiya.
>> Giving a rusty finishing to military vehicles
>> How to build a model kit
>> How to build a car model with open doors
>> How to paint with lacquers
>> Learning how to paint faces with acrylics
>> How to make a tarpaulin for military vehicles
>> Modelling a bust, Step by step
>> Modelling tips for newcomers
>> Painting a figure step by step
>> Painting, the key to plastic modelling.
>> Painting wheels for military in five steps
>> Placing tracks in the Tamiya's T-55
>> Realistic Fork Tubes for 1/12 scale motorcycles
>> Realistic chipped paint in military
>> Scratch Building helmets for cars and motorcycles
>> Spray booth, design and fan selection
>> T-34 Round-up. All the info and versions
>> Tamiya's paint to FS and Humbrol conversion chart
>> The "Weathering"
>> Weathering with the sponge technique
>> Weathering using pigments... step by step
>> Weathering tricks in airplanes for novice modellers
>> Wheels in F1 car models
>> Working with Alclad paints

Modelersite.net - These pages including all artwork are copyrighted 2006/2010 - Sitemap
 
Armor  Formula one  Cars  Motorcycles  Airplanes  Other 
 

Scale-Master Showroom Favourites Login Register
 

Alfa Romeo Monza - Part 4

Kit / Model  

Pocher Alfa Romeo 8c

Manufacturer  

pocher

Item Code  

K71

Scale  

1/8

Description  

Head w/Cams and Ignition
The head was textured in the same way same as the other engine parts. The cam covers are a mix of grays and pearls and metallics lightly textured with the dry application of the paint.
Believe it or not, there are only seven plastic parts, (coil -2, distributor-2, cam covers-2 and the head) and six metal parts (thumbscrews and coolant pipe), (not counting the brass eyelets and wires), visible in this assembly now. Lots of hand painting to bring out the molded in detail, but worth it... And the plug wires, (as funky of a red as they look in person), fortunately only look this pinkish color in the photos.

Here is the steering box, treated to the same "upgrades" as the other parts that are represented as cast metal. Sadly, the gears were so poorly manufactured it will never function well, even after I spent quite a bit of time trying to clean them up, but as I learned later it really doesn't matter as the pitman arm binds with the frame.

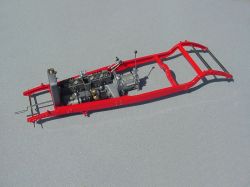
The engine installed in the frame. I found many "interesting" engineering ideas for how they used screws in this kit as I got deeper into it. Many screws are to be used in places they simply cannot be gotten to, many require you to unbuild several hours of work to gain access. Many also just don't line up. Reamers to open up holes and CA to keep them from stripping out helped.

Mounting the firewall and floor were a tough fit, but when checking how the body mates to the firewall I found some real big problems. More on that later...
The pitman arm rubs on the frame and there is no way short of notching the frame to give it clearance, but as I mentioned before, the gears were already bad so it was a moot point.

Related URL  

http://www.modelersite.net/viewShowRoom.php?id_contenido=806

Related URL  

http://www.modelersite.net/viewShowRoom.php?id_contenido=804

Category  

Cars

Project status  

In progress

Send an E-mail to member  

Only for members

Views  

12528

Facebook  


Leave a comment
Only for registered members
It has two cams that will not be seen once it is assembled, one still exposed here
 
 
Here is the steering box
Here is the differential and rear spring assembly. Again with the Faux Fabrix texturing...
The engine installed in the frame
The rear end installed...
The front suspension...
Mounting the firewall and floor....